


Table of contents
When we set up Kubernetes the default config file (aka kubeconfig file) has admin privileges. This is fine when you are the only one who is going to access the cluster(still not a good practice tho!) but what if there are multiple teams/devs involved and they also need to access the cluster for some use case, obviously, they don't need the full access, So now what? Will you give them your kubeconfig file(or the access) which has full permissions? Absolutely not!
Have you heard about the Principle of least privilege? It dictates - A subject should be given only those privileges needed for it to complete its task. If a subject does not need an access right, the subject should not have that right.
So we should create users as per the requirements and assign them the minimum permissions to function properly, right? but how do we do it?

Just to be clear, Kubernetes does not have the support for users natively. And from the documentation - "Kubernetes does not have objects which represent normal user accounts. Normal users cannot be added to a cluster through an API call."
Ways to set up users in K8s
There are multiple ways to create/manage users(basically the AUTHENTICATION part) in Kubernetes, for example -
- Bearer Token - Read K8s doc here for more details.
- Basic Auth (Username/Password) - For this, you need to start kube-apiserver with the
--basic-auth-file=name_of_auth_fileargument. This file contains list of users inpassword,user-name,user-idformat. - Auth using x509 certs - We can leverage Client-Side x509 certs to authenticate ourselves. And using RBAC we can authorize/restrict our users' access. FYI - this is what today's blog is all about.
Note - There are a bunch of other methods also available for the authentication in a k8s cluster. Check this for the same.
Flow
- Generate a set of x509 certificate/key for a user.
- Update the current kubeconfig file to add new user details.
- Create an appropriate role for the user. (Role/ClusterRole)
- Attach that role to the user. (RoleBinding/ClusterRoleBinding)
Requirements
- Working K8s Cluster (for sake of our blog post, I used (k3s) to quickly launch a fast & lightweight k8s cluster, must check!)
- Certificate Authority Credentials (CA Cert and CA Key to approve CSR)
- Minimal access to apply Role & Role Bindings.
Tutorial - Create a user in K8s
We will stick to the flow which we defined earlier. Suppose we want to create a user for Kratik Jain which is a newly joined Intern in XYZ Technologies. We don't want him to make any changes in our cluster which can mess things up, so we will be giving him read-only access. Let's Start -

Step-1 Generare x509 Certs (or Credentials)
We will be using OpenSSL for the generation and analysis of the certificates.
1.1 Create a private key for our user.
Private keys are meant to be kept private and used in encryption, so only ones who have this private key can decrypt the data. but here, it is used only to identify a user.
openssl genrsa -out kratik.key 2048
1.2 Create a certificate sign request
We will create a CSR for our user with our private key. Basically, it's encoded info requesting a certificate. Later we will use our Certificate Authority's credentials to create a valid certificate. Read more about CSRs here.
A CSR contains various properties but for our use case, one property is most important - Common Name aka CN.
Remember! using this common name, our K8s cluster will identify us. Whatever CN we define here, becomes our username in K8s.
So let's fire the below command to create a CSR -
openssl req -new -key kratik.key -out kratik.csr -subj "/CN=kratik/O=XYZ-Technologies"
1.3 Use CA Credentials and approve the CSR to generate the final Certificate
!Important - Locate your CA Credentials - the CA Cert and CA Key. Depending on your installation procedure, it may be stored at different locations.
For example, If you are using -
K3s, you'll find your creds at
/var/lib/rancher/k3s/server/tls/client-ca.crt&/var/lib/rancher/k3s/server/tls/client-ca.keyKind - As kind is Kubernetes in docker - you need to find the control-plane Docker container and there in the path
/etc/kubernetes/pki/you will find theca.crt&ca.key. Tip - Usedocker cpcommand to copy those files to your local machine.Kubeadm - you will find your CA creds in
/etc/kubernetes/pki/directory.
Assuming you have these creds in the current working directory as ca.crt & ca.key, fire the below command to use your CA Creds and approve the CSR, and generate the certificates.
openssl x509 -req -in kratik.csr -CA ca.crt -CAkey ca.key -CAcreateserial -out kratik.crt -days 365
Awesome! your key and cert are ready to be used!

Step-2 Update Kubeconfig to use new user creds
kubectl uses kubeconfig files to organize information about clusters, users, namespaces, and authentication mechanisms.
2.1 Adding user credentials
kubectl config set-credentials kratik --client-certificate=kratik.crt --client-key=kratik.key
2.2 Setting a new Context
kubectl config set-context kratik-context --cluster=default --user=kratik
Context in Kubeconfig file - From the official docs, "A context element in a kubeconfig file is used to group access parameters under a convenient name. Each context has three parameters: cluster, namespace, and user. By default, the kubectl command-line tool uses parameters from the current context to communicate with the cluster."
2.3 Testing kubectl commands to verify that it detects our user and fails
this will fail because we haven't assigned any role to it yet. (Which is EXPECTED!)

Notice that I am using a newly created context using the --context flag in the kubectl command. (BTW I am using k3s and k3 in my terminal is an alias for that )
Step-3 Create a Role that has fine-tuned permissions outlined
kind: ClusterRole
apiVersion: rbac.authorization.k8s.io/v1
metadata:
  name: role-for-read-only-access
rules:
  - apiGroups: ["extensions", "apps", ""] # "" indicates the core API group
    resources: ["*"]
    verbs: ["get", "watch", "list"]
kubectl apply -f ro-role.yaml
Step-4 Attach this RO role to our user
kind: ClusterRoleBinding
apiVersion: rbac.authorization.k8s.io/v1
metadata:
  name: read-only-role-binding
subjects:
  - kind: User
    name: kratik
    apiGroup: rbac.authorization.k8s.io
roleRef:
  kind: ClusterRole
  name: role-for-read-only-access
  apiGroup: rbac.authorization.k8s.io
kubectl apply -f ro-role-binding.yaml
Step-5 Testing the access
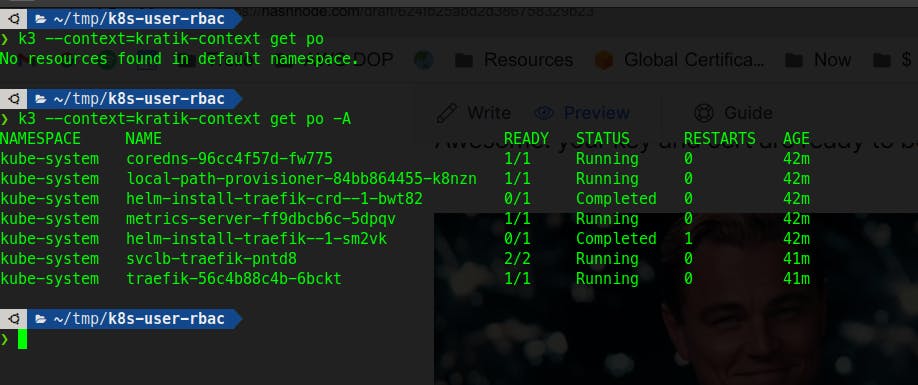
Fire the same command which we fired previously to check if the error is gone or not.
kubectl --context=kratik-context get po -A
Also, Let's try deleting the pod, let's see what happens 🤔

So this worked out finally as we wanted!!!

Now you can also tweak and fine-tune your Cluster role to give more granular access. I wanted to create something which is not bounded to some namespace but is usable throughout the cluster, so I chose the ClusterRole.